Tuesday, December 18, 2018

.::: How to Install Sangoma Driver, Wanpipe, DAHDI, LibPRI, Asterisk, Telephony Cards for elastix freepbx Without Error :::.

Sangoma cards are compatible with most commercially available servers and motherboards on the market. Our cards are available in both PCI and PCI express versions and are backwards compatible (i.e. 16x, 8x, 4x, 2x) Also available are different size brackets for 1U and 2U server form factors.

1. Selecting your Linux Operating system (Centos7 Minimal) 
on this lab 7.6.1810(3.10.0-229.el7.x86_64) 

Monday, November 5, 2018

.::: Install Openssl & Freeradius 3 using Source to other directory (/opt) :::.

default installation from yum (directory /etc/raddb})
exec=${exec:=/usr/sbin/$prog}
config_dir=${config_dir:=/etc/raddb}
config=${config:=$config_dir/radiusd.conf}
pidfile=${pidfile:=/var/run/$prog/$prog.pid}
lockfile=${lockfile:=/var/lock/subsys/radiusd}

using install from source from (directory /opt/freeradius3.0.17)
exec=${exec:=/usr/sbin/$prog}
config_dir=${config_dir:=/opt/freeradius3.0.17/etc/raddb}
config=${config:=$config_dir/radiusd.conf}
pidfile=${pidfile:=/opt/freeradius3.0.17/var/run/$prog/$prog.pid}
lockfile=${lockfile:=/opt/freeradius3.0.17/var/lock/subsys/radiusd}

Wednesday, October 3, 2018

.::: How To Mirroring Microsoft SQL Server 2012, 2014, 2016, 2018 & Trouble shoot SQL Server Error 1418, 1475,1478,1412 :::.:::

 
Prerequisites

    For a mirroring session to be established, the partners and the witness, if any, must be running on the same version of SQL Server.

    The two partners, that is the principal server and mirror server, must be running the same edition of SQL Server. The witness, if any, can run on any edition of SQL Server that supports database mirroring.

Monday, October 1, 2018

.::: Create Database, Table and Entry Data, Check Database Size on Microsoft SQL Server 2012 Using TSQL :::.

When working with a command or query window, the language used by SQL Server is TSQL.

Step 1 -Create Database

Create a new database called teguhtrihartodb by entering the following TSQL then pressing the “Execute” button on the top menu.

CREATE DATABASE teguhtrihartodb;
GO
The Messages window on the bottom of the screen should say, ”Command(s) completed successfully.”

Wednesday, September 19, 2018

.::: How to Simple Troubleshooting Error 'Duplicate entry '9999707' on slave/master MySQL/MariaDB include repair table database:::.

1. Get Error on replication/mirroring MySQL/MariaDB
 Last_Error: Error 'Duplicate entry '9999707' for key 'PRIMARY'' on query. Default database: 'teguht'. Query: 'INSERT INTO sessions (session_id, data_key, data_value, serialized) VALUES ('E6iNeYTAMo4FBl2gpoicy0kWVqYfTygv','LastScreenOverview','Action=AgentFAQExplorer;SortBy=FAQID;CategoryID=0;Nav=;OrderBy=Down;StartHit=1','0'),('E6iNeYTAMo4FBl2gpoicy0kWVqYfTygv','LastScreenView','Action=AgentFAQExplorer;SortBy=FAQID;CategoryID=0;Nav=;OrderBy=Down;StartHit=1','0'),('E6iNeYTAMo4FBl2gpoicy0kWVqYfTygv','LastViewedCategory','0','0'),('E6iNeYTAMo4FBl2gpoicy0kWVqYfTygv','UserFAQOverviewAgentFAQExplorer','Small','0'),('E6iNeYTAMo4FBl2gpoicy0kWVqYfTygv','UserLastRequest','1537333985','0')

Thursday, August 30, 2018

.::: How to Install Openstack Stein, Rocky, Quenns, Pike Using Bash Script one Push :::.

OpenStack is developed and released around 6-month cycles. After the initial release, additional stable point releases will be released in each release series. You can find the detail of the various release series here on their series page

1. Check new version openstack on this lab. openstack rocky <lastest version>
### yum install -y centos-release-openstack-rocky
### yum install -y centos-release-openstack-queens
### yum install -y centos-release-openstack-pike

Tuesday, August 28, 2018

.::: How To Redundant Set Master to Master(Replica) and Master to Slave(Mirroring) On MySQL (Include MariaDB) :::.

A. Configuring MySQL Server on Server01
1. Edit & add db file conf /etc/my.cnf
server_id=1
replicate-do-db=teguht
#bind-address=10.10.10.10
log-bin      = mysql-bin
binlog_do_db = teguht

set global read_only=on;
set global read_only=off;
skip-slave-start

set global read_only=1;

======  

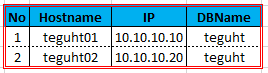
[root@MariaDB002 ~]# cat /etc/my.cnf.d/server.cnf

## -> only 1 database (teguhth)
[mariadb]
server_id=1
replicate-do-db=teguhth
#bind-address=10.10.10.10
log-bin      = mysql-bin
binlog_do_db = teguhth

## -> more 2 database (teguhth, secretdb, labdb)
[mariadb]
server_id=1
replicate-do-db=teguhth
replicate-do-db=secretdb
replicate-do-db=labdb

#bind-address=10.10.10.10
log-bin      = mysql-bin
binlog_do_db = teguhth
binlog_do_db = secretdb
binlog_do_db = labdb


sample log

.::: How to Install and Configuration PCS, COROSYNC, and Pacemaker for HA(High Availability) On Linux, Centos, Rhel :::.

Corosync is an open source cluster engine used to implement high availability within applications. Commonly referred to as a messaging layer, Corosync provides a cluster membership and closed communication model for creating replicated state machines, on top of which cluster resource managers like Pacemaker can run. Corosync can be seen as the underlying system that connects the cluster nodes together, while Pacemaker monitors the cluster and takes action in the event of a failure.

This tutorial will demonstrate how to use Corosync and Pacemaker to create a high availability (HA) infrastructure on DigitalOcean with CentOS 7 servers and Floating IPs. To facilitate the process of setting up and managing the cluster nodes, we are going to use PCS, a command line interface that interacts with both Corosync and Pacemaker.A. Pre Activity

Thursday, May 17, 2018

.::: Log Output Create Tenant Project, User, Keypair, Network, Floating, upload Image, Flavors, Instance In Openstack Using CLI :::.

this post as example log output from cli to Create Tenant Project, User, Keypair, Network, Floating, upload Image, Flavors, Instance

1. Create Project & User
# source keystonerc_admin
# openstack project create --description teguht-project-des teguht-project
# openstack user create --project teguht-project --password teguht --email teguh.triharto@microsoft.com teguht
# openstack project list
# openstack project show teguht-project
# openstack user list
# openstack user show teguht
# openstack user role list

.::: Create Tenant (Project, User, Keypair, Network, Floating, upload Image, Flavors) & launch Instance In Openstack Using CLI :::.

Continue from after posting install openstack packstack on centos7. this tutorial create instance detail using CLI(Command Line Interface)

1. Create Project & User
# source keystonerc_admin
# openstack project create --description teguht-project-des teguht-project
# openstack user create --project teguht-project --password teguht --email teguh.triharto@microsoft.com teguht
# openstack project list 
# openstack project show teguht-project

Friday, April 20, 2018

.::: Setting NFS Server & NFS Client on Centos7 to Connect Network Share :::.

Network File System (NFS) is a distributed file system protocol originally developed by Sun Microsystems in 1984, allowing a user on a client computer to access files over a computer network much like local storage is accessed. NFS, like many other protocols, builds on the Open Network Computing Remote Procedure Call (ONC RPC) system. The NFS is an open standard defined in Request for Comments (RFC), allowing anyone to implement the protocol.

A. Server (example 10.10.10.10 & /home/mounting)

1. Install Package
# yum install nfs* rcpbind

Tuesday, April 10, 2018

.::: Install OpenStack Newton All In One with Heat Service on CentOS 7 (Lab Verified) :::.

OpenStack is a free and open-source software platform for cloud computing, mostly deployed as infrastructure-as-a-service (IaaS), whereby virtual servers and other resources are made available to customers.The software platform consists of interrelated components that control diverse, multi-vendor hardware pools of processing, storage, and networking resources throughout a data center. Users either manage it through a web-based dashboard, through command-line tools, or through RESTful web services.

1. Disable SELinux
[root@openstack /]# cat /etc/selinux/config

Friday, March 16, 2018

.::: Create CDEF's on Cacti to Multiple or Division or other Calculation Mathematical Functions :::.

CDEFs allow you to apply mathematical functions to graph data to alter output. The concept of a CDEF comes straight from RRDTool, and are written in reverse polish notation (RPN). For more information regarding the syntax of CDEFs,

1. Console -> Management -> CDEF's -> New
  Name : Reamur

2. fill CDEF Item
cdef=CURRENT_DATA_SOURCE,4,*,5,/

Tuesday, March 13, 2018

.::: Create Graph Template Cacti base on OID/MIB :::.

Once one or more data sources are defined, an RRDTool graph can be created using the data. Cacti allows you to create almost any imaginable RRDTool graph using all of the standard RRDTool graph types and consolidation functions. A color selection area and automatic text padding function also aid in the creation of graphs to make the process easier.

Not only can you create RRDTool based graphs in cacti, but there are many ways to display them. Along with a standard "list view" and a "preview mode", which resembles the RRDTool frontend 14all, there is a "tree view", which allows you to put graphs onto a hierarchical tree for organizational purposes.

base on sample http://teguhth.blogspot.co.id/2018/01/monitoring-oidmib-temperature-fan-speed.html
A. Create Data Template
1. Console -> Data Template -> Add

2. Fill Data Template
  Data Templates
  Name : Temperature @ Ocelot
 

Wednesday, February 7, 2018

.::: How to configure remote logging with rsyslog(Enable syslog) On Linux/Rhel/Centos :::.

In RHEL-6 rsyslog is default logging daemon, In RHEL-5 rsyslog is available but not installed by default.

1. Install rsyslog
# yum -y install rsyslog 

2. Configure the remote server(CLIENT) to accept remote log messages using TCP/UDP.
Uncomment the following lines in the MODULES section of /etc/rsyslog.conf
[root@TeguhClientSyslog ~]# cat /etc/rsyslog.conf
.....
# Provides UDP syslog reception
#$ModLoad imudp
#$UDPServerRun 514

Tuesday, February 6, 2018

.::: OID Memory Utilization for Monitoring Windows, Linux :::.

This resource displays linear or radial gauges of both the percentage load on the CPU of the selected node and the percentage of available MEMORY on the selected node over the current monitoring period. Reported values are updated regularly, on the Polling Interval.


1. OID for Memory Utilization
hrSWRunIndex hrSWRunIndex     1.3.6.1.2.1.25.4.2.1.1 Memory Index
hrSWRunName hrSWRunName     1.3.6.1.2.1.25.4.2.1.2 Memory Name
hrSWRunPerfMem hrSWRunPerfMem     1.3.6.1.2.1.25.5.1.1.2   Memory Usage
hrMemorySize hrMemorySize     1.3.6.1.2.1.25.2.2 mem total Memory Total
[root@TeguhLab ~]# snmpwalk -v2c -c public 10.10.10.10 sysDescr
SNMPv2-MIB::sysDescr.0 = STRING: Hardware: Intel64 Family 6 Model 62 Stepping 4 AT/AT COMPATIBLE - Software: Windows Version 6.0 (Build 6002 Multiprocessor Free)
[root@TeguhLab ~]#

Thursday, February 1, 2018

.::: OID CPU Utilization for Monitoring CPU Windows, Linux, Appliance & Other :::.

CPU utilization is the sum of work handled by a Central Processing Unit. It is also used to estimate system performance. CPU utilization can vary according to the type and amount of computing task because some tasks require heavy CPU time while others require less CPU time. Process time is another name for CPU time and is the amount of time used by a CPU for processing instruction of an operating system or a computer program. CPU time is quantified in clock ticks or seconds. CPU utilization shows the burden on a processor in terms of percentage that indicates if any changes are to be made in the system otherwise it may get exhausted of capacity.

CPU utilization can be calculated by using the following formulas.

Let us define CPU utilization as U


U = 100% - (Percentage of time that is spent in idle task)


% time in idle task =

(Take the average time period of background task without load) * 100%
-------------------------------------------------------------------------------------------------------
(Avg. period of background task including some load)

Monday, January 22, 2018

.::: Add Sensor Factory on PRTG :::.

The Sensor Factory sensor is a powerful tool that allows you to monitor entire business processes that involve several components.
You can define one or more channels that combine monitoring results from other sensors or devices. You can create your own individual sensor with channels based on data from other sensors or devices.
Samples for usage are:
    Show single channels of one or more sensors in one graph.
    Use the data from single channels of one or more sensors to calculate new values (for example, you can subtract, multiply, and divide).
    Create graphs with data from other sensor channels and add horizontal lines at specific vertical positions.

.::: Add Sensor SNMP Custom on PRTG :::.

The SNMP Custom sensor monitors a single parameter that is returned by a specific Object Identifier (OID) using Simple Network Management Protocol (SNMP).
This sensor shows a single numerical value (int64) for a given OID. Each OID always refers to a specific parameter of a certain SNMP device.

base on sample monitoring palo alto using OID , this resume to monitor
1. snmpwalk device and make sure output

[root@TeguhLab ~]# snmpwalk -v2c -c public 10.10.10.10 1.3.6.1.2.1.47.1.1.1.1.7.10
SNMPv2-SMI::mib-2.47.1.1.1.1.7.10 = STRING: "Temperature @ Switch Core"
[root@TeguhLab ~]# snmpwalk -v2c -c public 10.10.10.10 1.3.6.1.2.1.99.1.1.1.4.10
SNMPv2-SMI::mib-2.99.1.1.1.4.10 = INTEGER: 51
[root@TeguhLab ~]# snmpwalk -v2c -c public 10.10.10.10 1.3.6.1.2.1.99.1.1.1.5.10
SNMPv2-SMI::mib-2.99.1.1.1.5.10 = INTEGER: 1
[root@TeguhLab ~]# snmpwalk -v2c -c public 10.10.10.10 1.3.6.1.2.1.99.1.1.1.6.10
SNMPv2-SMI::mib-2.99.1.1.1.6.10 = STRING: "(C)"
[root@TeguhLab ~]#

Friday, January 19, 2018

.::: Monitoring (OID/MIB) Temperature, Fan Speed PaloAlto Firewall On NMS(PRTG, Infosim Stablenet):::.


Palo Alto Networks, Inc. is a network and enterprise security company based in Santa Clara, California. The company’s core products are a platform that includes advanced firewalls designed to provide network security, visibility, and granular control of network activity based on application, user, and content identification and cloud-based offerings that extend those firewalls to cover other aspects of security. In 2017, Palo Alto Networks announced the availability of its new cloud-based service Logging Services, allowing customers to amass their own data.
for this Monitor Temperature, Fan speed Must enable ENTITY-SENSOR-MIB.mib

This is lab specialist for palo Alto PA-3000 / PA-3020
OID PA-3020 = OID PA-5050 =OID PA Firewall

1. Info Hardware Temperature & Fan

info OID Hardware : 1.3.6.1.2.1.47.1.1.1.1.7

[root@TeguhLab ~]# snmpwalk -v2c -c  teguht 10.10.10.10 1.3.6.1.2.1.47.1.1.1.1.7
SNMPv2-SMI::mib-2.47.1.1.1.1.7.1 = STRING: "PA-3020"
SNMPv2-SMI::mib-2.47.1.1.1.1.7.2 = STRING: "Fan #1 RPM"
SNMPv2-SMI::mib-2.47.1.1.1.1.7.3 = STRING: "Fan #2 RPM"
SNMPv2-SMI::mib-2.47.1.1.1.1.7.4 = STRING: "Fan #3 RPM"
SNMPv2-SMI::mib-2.47.1.1.1.1.7.5 = STRING: "Fan #4 RPM"
SNMPv2-SMI::mib-2.47.1.1.1.1.7.6 = STRING: "Temperature @ Ocelot"
SNMPv2-SMI::mib-2.47.1.1.1.1.7.7 = STRING: "Temperature @ Switch"
SNMPv2-SMI::mib-2.47.1.1.1.1.7.8 = STRING: "Temperature @ Cavium"
SNMPv2-SMI::mib-2.47.1.1.1.1.7.9 = STRING: "Temperature @ Intel PHY"
SNMPv2-SMI::mib-2.47.1.1.1.1.7.10 = STRING: "Temperature @ Switch Core"
SNMPv2-SMI::mib-2.47.1.1.1.1.7.11 = STRING: "Temperature @ Cavium Core"
[root@TeguhLab ~]#

Friday, January 12, 2018

.::: How to Create Tablespace & Check Capacity, Add datafile On existing tablespace, Change Autoextend :::.

A tablespace is a container for segments (tables, indexes, etc). A database consists of one or more tablespaces, each made up of one or more data files. Tables and indexes are created within a particular tablespace. Oracle has a limit of 64,000 data files per database.

1. Create new tablespace, create user, grant previledge
[oracle@TeguhLabOracle ~]$ more Teguhdatatgh.sql
CREATE TABLESPACE Teguhdata DATAFILE '$ORACLE_BASE/oradata/tgh/Teguhdata.dbf' size 100M AUTOEXTEND ON;

Tuesday, January 2, 2018

.::: How Settting & Install Package OS Centos 7 Using Repolocal, ISO File :::.


1. Make sure Iso file copying on Disk
[root@TeguhLab7 data]# ls
CentOS-7-x86_64-DVD-1708.iso                 lm_sensors-3.4.0-4.20160601gitf9185e5.el7.x86_64.rpm       net-snmp-perl-5.7.2-28.el7.x86_64.rpm  repolocal
compat-libstdc++-33-3.2.3-72.el7.i686.rpm    lm_sensors-libs-3.4.0-4.20160601gitf9185e5.el7.x86_64.rpm  psensor-1.1.3                          snmpd
compat-libstdc++-33-3.2.3-72.el7.x86_64.rpm  lm sensor.txt                                              psensor-1.1.3.tar.gz
[root@TeguhLab7 data]#


for repolocal
[root@Centos7 yum.repos.d]# df -kh
Filesystem               Size  Used Avail Use% Mounted on
/dev/mapper/centos-root   27G  7.7G   19G  29% /
devtmpfs                 2.9G     0  2.9G   0% /dev
tmpfs                    2.9G  156K  2.9G   1% /dev/shm
tmpfs                    2.9G  8.9M  2.9G   1% /run
tmpfs                    2.9G     0  2.9G   0% /sys/fs/cgroup
/dev/sda1                497M  124M  373M  25% /boot
/dev/loop0               4.3G  4.3G     0 100% /mnt
/dev/sr0                 4.1G  4.1G     0 100% /run/media/root/CentOS 7 x86_64

[root@Centos7 yum.repos.d]#


2. mounting to /mnt
[root@TeguhLab7 data]# mount -o loop CentOS-7-x86_64-DVD-1708.iso /mnt/

Popular Posts